Tuesday, June 7, 2016

Cross Body Bag - SoSewEasy - Refashioned from 3 old blouses

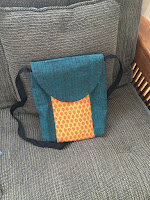
Another bag for my sister. This one is the Cross Body Bag from So Sew Easy. I discussed it with her and we decided to use fabric from three of my old handloom cotton blouses for this bag. The fabric is traditional Indian cotton print and was perfect for this project.


This pattern is excellent and accompanying video makes it an easy sew. Bulk of the time was spend cutting out the pieces. The pattern had a great tip of labelling the pieces as you go which I used.This really helped because there were many pieces and it is easy to get confused.

It took me a day to cut the pieces and another couple to sew it up ( about 3 to 4 hours every day ). I love the finished bag though I think it is a tag too big. If I make it again I will try and reduce the size a bit.


To give you an idea of the size the bag easily fits my iPad mini in the front pocket and can fit my macbook air inside. It has lot of pockets and is very functional.

The changes I made are

  • Added a swivel hook for keys
  • Divided the inside slip pocket to fit iPhone 6 and inhaler
  • Used webbing for strap
I love this bag and recommend it for beginners.


Monday, April 25, 2016

Phoebe Bag by Rebeka Lambert

Finally a post after period of silence. My sister wanted a cross body purse for daily use. She wanted it to be small but utilitarian. In my search for small but pretty purses I came across the Phoebe bag. This is a free pattern by Rebeka Lambert. What a beautiful bag and very easy to sew. The instructions were simple with good photographs. I also found a youtube video Sew Along by Anna Costa. Together this was an easy sew and my sister loved the bag.


The bag has a beautiful shape and uses darts instead of the normal boxing. It has a simple tab closure with a magnetic snap. The original pattern calls for one big pocket. The bag comes with a short single strap.

I made the following changes to the pattern - Added a swivel clip attachment for keys, Outer zip pocket, Two inside slip pocket on both sides divided to two pockets for phone etc. I also increased the strap length to cross body and used D Rings to attach the strap. An iPad mini fits in nicely.
Swivel Clip
Outside Zip Pocket

For the outer body I used a flower print quilting cotton, the lining is a matching beige recovered from an old sheet. Fusible fleece is the stabilizer as my sister wanted it to be soft but not stiff.

All in all the bag was an easy sew. If someone wants to try their hand at bag making this will be a good place to start. Anna Costa's sew along video has some very good tips - make the lining a little smaller than the outer bag, snip off the excess fabric from the darts, baste the straps and the tab closure before attaching the lining, clipping the curves, top stitching etc. I think these tips really made my bag look professional.
My sister with the bag


Monday, August 24, 2015

Simplicity 1316

I have never sewn princess seam before and was curious to try it. After looking at various patterns I decided on trying a simple top Simplicity 1316. Went with view B but without the trims. For fabric I went with this silky material in my stash. I think it is some kind of polyester mix. Not a fan of this fabric as it is unraveling like crazy.

This pattern has many neckline variations and it does not have a set in sleeve. So it is a very easy beginner pattern. The instructions are very clear and I was able to cut and sew the blouse in  day. Because the fabric frays so much I finished every seam with a zigzag. All in all a very easy sew.


How it looks on me is another story. I think this style is more suited for thinner figures. I am not sure if it is the princess seam or if it is the fabric I feel that it is ballooning esp in the chest area and is not very flattering on me.

I still enjoyed sewing this. I really like the neck, I think facing makes the neck look nicely finished. Looking for suggestions on if it might look better if I go up one size.

Monday, August 10, 2015

August MAGAM completed - Newlook 6351 - Drawstring trousers

For August MAGAM the theme is Back to basics. I am taking a vacation in September and wanted comfortable travel pants. Why not try Newlook 6351view B.


I also wanted to make sure that the pants don't look like Pajamas, so decided to do a muslin. If it turned up  looking like Pajamas I could always wear it at home.

The fabric is a soft hand-loom cotton from my native Kerala, India. I did not have enough fabric so you will see the border peeking at the bottom of the leg and also in the back. I also had to use a little bit of the border in the back pocket. For the side pockets some remnant from another project got used.

This was an easy sew. The side pockets are a little different from what I have done before. It is cut on the fold to eliminate a seam and is cut straight instead of a curve. I liked it that it went into the waist band.

The back pocket is folded patch pocket. I modified and lined the pocket to avoid the folding. You can see the border on the back-pocket due to lack of fabric.


I went with size 20 but I think I can come down at least one size. The pattern came with an elastic guide and I needed to cut at least 5 or 6 inches lesser of the elastic. I also found the legs boxy so took in 1 inch from each of the side seam. and tapered it up to the thigh. So what do you all think? Does it look like a Pajama or can I use it as travel pants with a different fabric? Love to hear your opinion. I will definitely sew this again even if it is as a Pajama pant.

Thursday, June 18, 2015

June MAGAM McCalls M5978

June MAGAM calls for using a fabric from your stash. I have a very small stash and it has no knit fabric in it. So I am being adventurous or stupid :) and using a woven fabric for a knit pattern M5978  - A cardigan. I will be doing view D without the embellishment, This fabric is from the clearance aisle, bought it a couple of years back. It frays badly and I am hoping that a zigzag stitch will help fraying at the seams. Am not sure how to prevent fraying at the armhole area, maybe someone more experienced can give me a tip.

I am planning to cut a size bigger and also going to compare finished garment size to figure out the knit vs woven dilemma . Wish me luck :)


Sunday, May 31, 2015

Simplicity 8523 - Misses top

After the disaster with the McCalls M6844 I decided to try something simple. I also wanted to enter the beginners pattern contest and had less than a week to come up with an entry. This coupled with me working over the weekend made me choose this supposedly simple pattern for a blouse.
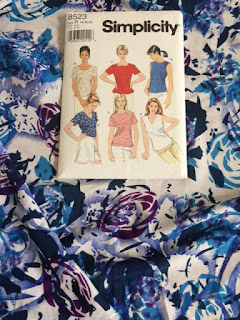
I choose a soft polyester from my stash, I think it was bought from Hancock fabrics. The fabric was a little thin and this was my first time sewing with polyester. The good part is that it does not unravel, the bad part is that it does not hold creases and was very hard to iron because I had to do it with low heat and lots of steam.


Now to the pattern - I choose size 14 and graded to size 16 at the hips. This was the first time I choose to measure the pattern. It has a lot of ease at the waist (11") but I did not have a lower size so 14 it had to be, knowing it was not going to look nice :(

Another first for me was to use the rotary cutter to cut my fabric. I saw this in the British sewing bee series and wanted to try. It was scary initially but I got better. I am never going back to scissors again. :)

The pattern went in smoothly in the beginning. Sew the dart - I referred to my craftsy class, sew the shoulder seam, and side seams. Then sew the facings, trim and notch.  This was too little instructions for me, so I went back to the Craftsy class Sassy librarian blouse and followed the facing instruction there.


Next came the set in sleeves. I stitched two rows of easing stitches and eased in the sleeve and stitched thinking that it was not bad. Then realized I had put the sleeves in the wrong way :(. So unpicked the stitches and put it back in again and this time it went in smoothly. I tried the blouse on it looked like a tent. It was very boxy and did not have any shape.


So I looked up some videos on waist shaping and using my curved ruler took the waist in on both sides. This is the final result. I think it is wearable.



Sunday, May 24, 2015

May MAGAM McCalls M6844 completed

Mccalls M6844 was supposed to be an easy sew. There is a video tutorial on this pattern by Crafty Gemini plus this was voted top pattern in pattern review. All these prompted me to pick this one for my may MAGAM.

This was the first time sewing knits for me and I scoured the internet to find tips for knit sewing. I picked  a black ponte knit from Joann's. Ponte knit is supposed to be one of the easier knits to sew.
I started off by washing and pressing my fabric and cut out the pattern for view A.

Initially everything seemed to be going well. I was thinking to myself I am going to finish a garment in a weekend Wow!! But things never go the way you think do they ;)

I reached the collar part of the cardigan and things start going south. The pattern called for interfacing the collar. Many of the reviews advised against this but I went ahead and interfaced. Wanted to see how the pattern looks as it was built. Maybe the fault was in using regular interfacing instead of one for knits ( I did not even know there were interfacing specific to knits !!) or maybe it is my machine. I noticed that the lower side of the fabric was moved by the pressure foot different from upper so I was doing my best to stretch and sew to make then even Ughhh

Finally I somehow got the collar in, and then found that it was not staying floppy like in the picture. I tried pressing clipping notching, pressing again and it still would not behave. Off to the internet again - posted question on pattern review and  to Anne, fellow MAGAM participant who had done a beautiful version of this pattern in April. She was kind enough to respond and give some tips and so did pattern review experts.

I under stitched and top stitched the collar and pressed and steamed a lot and this is the result. I am not a happy with this pattern :( and am still scared of knits.


One tip which I really liked was for hemming- I followed Crafty Gemini's tip - Stitch at half your hem allowance and then fold at the stitch for the hem. Hem folding went much easier after I followed this tip.